
Sensory Blog: Self Regulation- What You Need To Know – Part 2
Self Regulation- Part 2 of 2
Guest blog written by Occupational Therapy Assistant Student, Juliana Lehman OTAS
Advisement, Editing and Supervision by Deborah Bebeau EdD, OTR
Quick recap of Self-Regulation, Part 1:
Self-regulation reflects self-control but additionally involves emotional and social components.
- Be on the lookout for triggering situations.
- Assist children to identify emotions especially when reaching frustration overload.
- Come up with a secret code to communicate feelings or behaviors related to increased anxiety or frustration.
- Provide cues when space is needed.
To read or review Part 1, please click HERE
Self-Regulation, Part 2 – Zones of Regulation Activities:
The Zones of Regulation, created by Leah Kuypers, OTR, assigns specific emotions or physical states of alertness to four different color zones. This system, when practiced, helps children, parents, teachers, and caregivers know when to calm, comfort, motivate, energize, or defuse emotions to help facilitate participation in the task at hand.
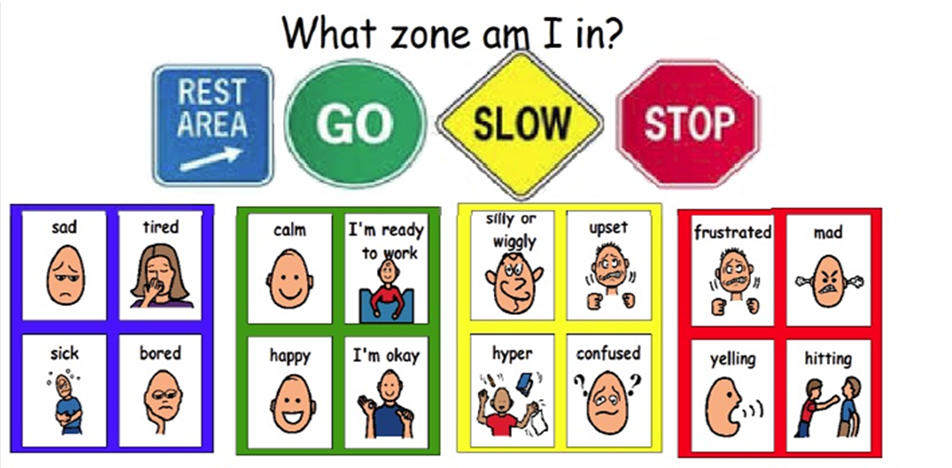
Discover what Zone an individual occupies.
To use the Zones effectively, first help your child identify what feelings, energy levels, and behaviors are associated with each color. The Blue Zone encompasses a low energy state and feeling sad, tired, ill, or bored. The Green Zone connects to feeling focused, calm, happy or “A OK” and ready to learn. The Yellow Zone relates to feeling excited, anxious, frustrated, or like you are starting to lose control, and inability to sit still. The Red Zone relates to feeling anger, elation, loss of control, scared, and associated behaviors may be high volume in voice and action, like shouting or hitting.
There are many fun crafting activities that you and your child can do together to learn how to identify what feelings or behaviors are associated with a particular color zone.
Create A Zone of Regulation Picture Frame: Put the Zone in perspective—it is all about the frame and discovering what zone your child is in now. Here is how to make a zones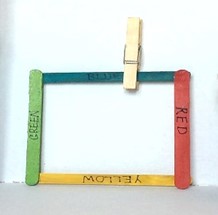 of regulation picture frame!
Supplies needed: 4 Popsicle sticks (per frame), black Sharpie, markers or paint in the four zone colors, blue, green, yellow and red, a clothespin or a binder clip, and glue.
Step 1: Paint or color each Popsicle stick and allow to dry
Step 2: Lay out your square, blue to red to yellow to green, two will sit behind and two in front, glue together and allow to dry, consider if you want to label colors with a word to reference the corresponding emotion.
Step 3: Once dry, use the clothespin or binder clip and allow your child to identify in the moment what zone they are in and how they are feeling…
Next, let’s look at activities that can help move us from one zone to another when needed. After validating what is being felt first, consider an activity that motivates your child to move from one zone to the next.
No right or wrong zones exist. The key is to match the zone with the given environment or activity. For example, the feelings and visible behaviors associated with the green zone are often preferred during class time in school. The yellow zone may match better with recess time and the blue zone with bedtime. When you and/ or your child can recognize feelings and behaviors related to a particular zone that may not match a specific environment or activity, then you can implement strategies to achieve better regulation in the moment.
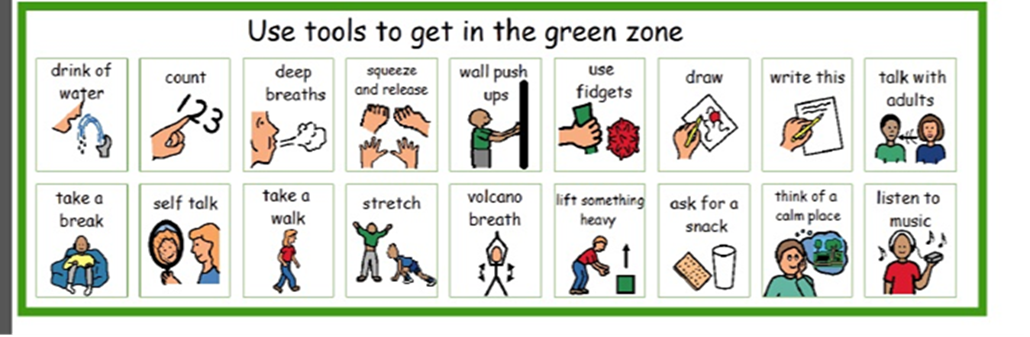
- To transition from the Blue to Green Zone consider doing a fun energizing exercise or game like jumping jacks or blowing bubbles.
- To move from the Yellow to Green Zone, try fidget tools/toys like spinners or squishy balls, take a few calming deep breaths, or talk to an adult.
- To move from the Red to Green Zone, take a pause from the current activity by getting a drink of water, taking a few calming deep breaths, or changing location from inside to outside or vice versa. With extreme emotions, allow some time for calming down and be a model of calm.
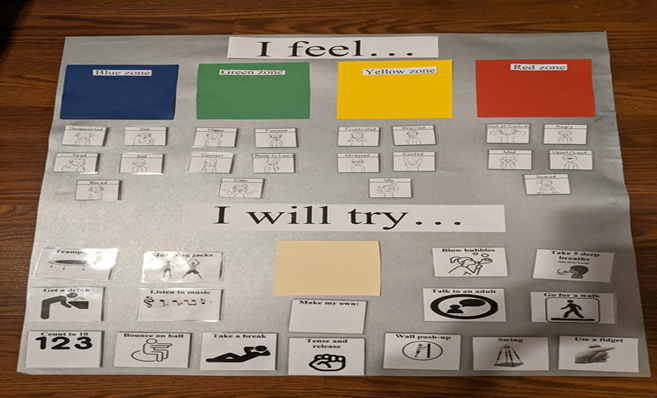
Create a Zones of Regulation Action Board: Use pictures to identify activities that may help your child navigate from the Blue, Yellow, and Red Zones back to the Green Zone.
Supplies needed: One large Poster-board, four pieces of construction paper, one in each if the colors, blue, green yellow and red, White printer paper to draw or create pictures of action solutions, black Sharpie, Clear Packing tape or cold seal laminating pouches, self adhesive Velcro strips (available on Amazon), Black sharpie, scissors
Step 1: Print out traffic signs, emotion, and activity rectangles from this blog or the internet (above from Pinterest). Feel free to draw or make your own pictures of things that work for your child
Step 2: As on the sample picture, place the four colors for the zone rectangles across the top of the Poster-board, labeling with sharpie or traffic signs in corners of colored rectangles, tape to secure and laminate with clear packing tape.
Step 3: Use the clear packing tape to laminate the other rectangles of emotions and activity rectangles, front and back, take your time, placement can be tricky.
Craft and photo credit: Alyssa Mincberg, OTAS
Step 4: Cut Velcro strips and adhere one base side to color block zone sections in a couple of rows, leaving space to move fit multiple emotion and activity solutions rectangle in color blocks.
Step 5: Adhere the gripper side to the back of the rectangles just laminated with the base side facing out.
Step 6: Attach the emotions under the color blocks, by the words, I feel______”, You can put your child’s name in here if you’d like or be creative.
Step 7: Attach the activity solutions rectangles, by the words, “I will try______” Again be creative here. Also place one additional laminated or package sealing tape covered construction paper square as a solution box, see above.
Step 8: Practice identifying emotions within the color zones at least once a day as emotions and energy levels fluctuate. Let your child select a solution to try to transition to a new zone as needed.
How to know which solution pictures to choose? This depends completely upon your individual child. To some a walk will invigorate, to others it will calm. What has worked in the past to soothe or motivate? Start there and use unique solution pictures in the craft specific to your child.
A source for Zone friendly printout materials: https://zonesofregulation.com/free-downloadable-handouts1.html
Disclaimer: By referencing products or services this author does not directly or indirectly endorse any
specific product or services. This blog is for informational purposes only and is not intended to give
medical advice. Please consult with your child’s physician or licensed practitioner and consider the
individual needs of your child.
Guest blog written by Occupational Therapy Assistant Student, Juliana Lehman
Advisement, Editing and Supervision by Deborah Bebeau EdD, OTR
Resources Blog 5 part 2
1. All the Zones are OK! Tips for Managing the Zones You’re In Leah Kuypers, MA Ed., OTR/L, https://www.socialthinking.com/Resources
Recent Posts


